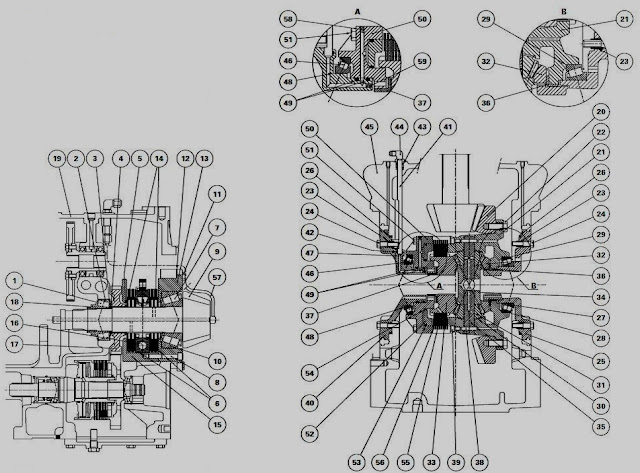
Removing and refitting the differential unit assembly
Preparation for fitting
Uncouple the tractor between the intermediate housing and the centre housing. If necessary, separate the PTO housing from the centre housing.
Remove the trumpet housings.
Take off union (44) and raise the transfer tube (42). Unscrew the ground speed sensor to avoid interference with the crownwheel. Remove the brake pistons. Place and tighten sling ref. 3378116M1, in position 2 (this position corresponds to a differential assembly with a multidisc differential lock on the rear axle with an AG250 Full Powershift gearbox). Using the sling, hold the differential assembly in the axis of the left and right-hand carriers (25) (40).
Removing the differential unit
Remove bolts (24) from the carriers and fit the guide bolts "G" in accordance with Figure. Extract and remove the carriers by inserting two bolts "V" through the tapped holes as shown in Figure. Recover the cone (46) and shims (48) from carrier (40). Remove the O�rings (26).
Take out the differential assembly from the centre housing.
Refitting
Since space is limited around the differential unit, it is essential to fit the auxiliary spool valve and lift control valve return pipe in the housing (45) before refitting the unit. In order not to damage the seal rings (49), it is necessary to correctly align the differential assembly along the axis of the centre housing before inserting carriers (25) (40).
Using the sling, introduce the differential assembly into the centre housing and hold it in the axis of the trumpet housings.
Assembling the right-hand carrier (25)
Screw two diametrically opposed guide studs into the centre housing. Check for the presence of centring bush (23). Lubricate and fit a new O�ring (26). Insert the carrier (25) using the four bolts (24) uniformly and alternately tightened to a torque of 100 � 130 Nm. Tighten the other bolts to the same torque.
Assembling the left-hand carrier (40)
Slide bearing cone (46) on to tool, ref. 3378117M1, adapted for the differential with hypoid bevel gear and multidisc lock. Using the tool, centre the differential assembly in the housing by manually turning the central bolt clockwise until it encounters resistance. Screw two diametrically opposed guide studs into two holes in the centre housing, their ends thrusting
against cover (50) of the differential lock. This method allows the centring of the differential assembly to be retained after removal of tool ref. 3378117M1, in order to later provide a correct fitting of the left-hand carrier (40) without damaging the seal rings (49). Remove the tool and recover the bearing cone (46). Check for the presence of centring bush (23) in the housing and fit a new O�ring (26) on to carrier (40).
Check that the seal rings (49) have not been damaged and that they turn normally in their grooves. After this check, remove the seal rings (and coat them with miscible grease so that they remain at the bottom of the groove during refitting of the carrier. Place shim(s) (48) and slide the bearing cone (46) on carrier (40). Insert the carrier into the housing using the four bolts (24) uniformly and alternately tightened to a torque of 100 - 130 Nm. Tighten the other bolts to the same torque. After fitting the carriers, manually check the rotation of the differential assembly. Refit the brake pistons.
Special points
- If the carrier (1) of the ground speed sensor (2) has been removed, position the carrier previously lightly smeared with Loctite 510, with the offset of the sensor turned towards the longitudinal axis of the centre housing as shown in Figure.
- Tighten the bolts (3) previously lightly smeared with Loctite 542 to a torque of 25 - 35 Nm.
- The end of the sensor must always be placed above the teeth of the crownwheel of the differential.
- Fit and adjust the ground speed sensor lightly smeared with Loctite 577 (Sensor Sealing or equivalent).
Refit transfer tube (41) and union (44). Refit the trumpet housings.
If the PTO housing has been removed, assemble it with the centre housing.
Couple the tractor between the intermediate housing and the centre housing.
Check the correct operation of all controls (mechanical, hydraulic and electronic). Carry out a road test. Check the oil tightness of the mating faces and hydraulic unions.
Removing and refitting the multidisc lock
Remove the differential unit.
Removal
Place the differential unit with the lock turned upwards. Loosen and take out bolts (51). Take off the cover (50). Separate the discs (56) and intermediate plates (55) from the left-hand sun gear (33). Gently tap the cover (50) on a wooden block to remove the piston (52). Remove O�rings (53) (54).
If necessary, drive out cup (47).
On the left-hand carrier (40)
Remove the seal rings (49) and O�ring (42).
Reassembly
If unit (21), cover (50) and carrier (40) have been replaced, it is mandatory to carry out shimming of the differential unit and to check the backlash between the drive pinion and the crownwheel.
Clean and check the components. Replace any parts found to be defective.
Check that the hydraulic channel in cover (50) is not obstructed. Lubricate and fit new O�rings (53) (54) on piston (52). Insert the piston by tapping around its rim with a plastic hammer. Check that there are no seal fragments after insertion. Assemble the intermediate plates (55) and discs (56) as shown in the overall view.
Position cover (50) fitted with piston (52). Fit bolts (51) lightly smeared with Loctite 270 and tighten to a torque of 100 - 130 Nm. Manually check that the discs and intermediate plates are not constrained in any way.


0 comments:
Post a Comment